Showing posts with label Shaker Card. Show all posts

Tuesday, 1 November 2016

Christmas in Black

Here is one of my more untraditional Christmas cards 'cause it's very black. 


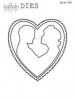
This is a shaker-Christmas card. All the little hearts within the big heart are so lovely - a mix of glitter hearts, black and plain red hearts.

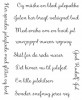
The sentiment is Danish and means: 
Christmas Joy is spread with glitter and card. 

I don't know about you, but I always struggle with taking photos of black projects. This also goes for this one.  


I made this card for a Guest Designer spot for Norwegian Kaboks in September. 
I have previously been on their design team and was asked to join in for a visit :) 

At the top of the heart I have placed two red glitter birds. For some this could be cardinals but in Scandinavia our winter bird is the Dompap (guess it's called Bullfinch in English).
 

 Hugs, 
Pia xx


Supplies used: 

Thursday, 1 January 2015

Shaker card for Spring

Just having fun today crafting and making a shaker card for the Winnie & Walter Birthday Bash, as they are turning 1 year.
Here is the card I have created for their "Shaker Challenge".

To make the shaker card I have used rubber foam sheets which I have die-cut with the InstaFrame die as well. It gives a perfect match for the paper front.


Hope you all have had a good start to 2015!
Pia :)
Supplies used:

Wednesday, 17 July 2013

Cupcake "shaker" Card....'Cause You're Super Sweet!

Another day has come and it is yet again time for homework! This is week 2, Day 3, at the Summer Card Camp 2 class with OnlineCardClasses.com.

Today we were overwelmed by the number of guest artist showing their flair and magic with cards. I have chosen to give the shaker card - shown by Kelly Marie Alvarez from Lawn Fawn Stamps.

And we still have to use this weeks colour combination!


I really had trouble figuring out what to put inside the shaker. Didn't have anything which matched the colour combination. So I ended up using an office puncher to punch a bunch of dots in two shades of green and light blue.

Kelly Marie showed a trick that was now to me. When the 3D adhesive (I used 2 layers) has been put on the base piece, then use the powder tool to the inside of the shaker room and the sides of the 3D adhesive. This is done to remove the worst stickyness and prevent the filling to get stuck.

For the window I have used a piece of a clear office plastic manila folder.


Supplies used: